Configuring Windows 8 PC to use Skyway West IP and DNS Settings
Before proceeding make sure you have the IP and DNS information provided to you by Skyway West. If you do not have this information please contact support@skywaywest.com to request the information. Please note these instructions are assuming you are connecting your computer directly to the ADSL router provided by Skyway West. If you are connecting to a router that you own you may need to contact your IT professional for assistance with this procedure and the setup requirements may be different.
1. Finding the place where your settings are stored:
The first thing you’ll need to do to change your settings is to find where they located. If you are at all familiar with Windows vista or Windows 7 this should be relatively straight forward.
First move your mouse to the lower right hand corner of your screen by the clock. As image 1 shows, you need to get right into the corner. Once there move your mouse up towards the top of the screen. This will bring up the Charms menu. Select settings by left clicking your mouse on the icon. Alternatively you can hold down the Windows key on your keyboard and press ‘C’ (without the quotes), to get to the Charms menu.
In the settings window left mouse click on the control Panel option.
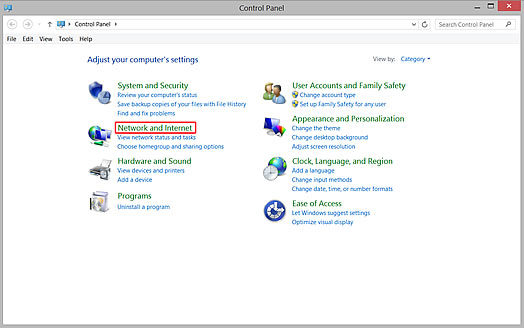
From here Windows Vista/7 fans, Its pretty well the same. Left mouse click on Network and Internet.
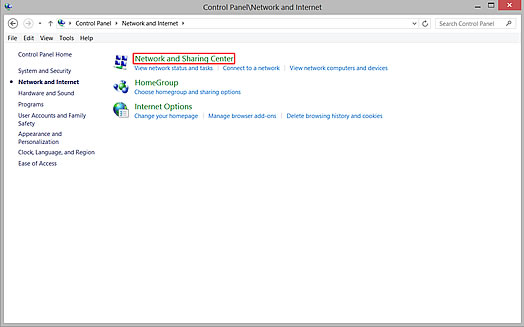
Now left mouse click on Network an Sharing Centre.
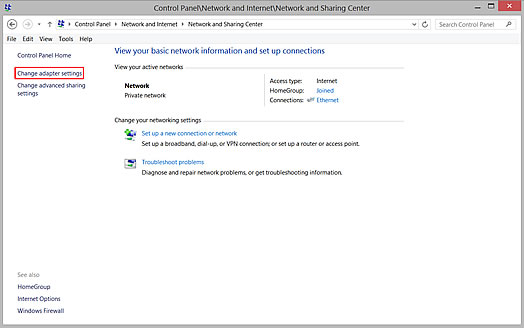
Now left mouse click on Change Adapter Settings. You’ll find this on the left side of the screen
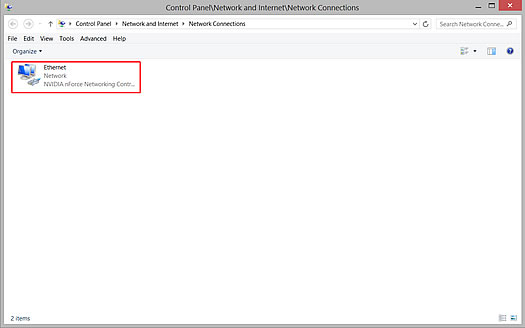
Now right mouse click on Ethernet and select Properties from the menu you are presented with.
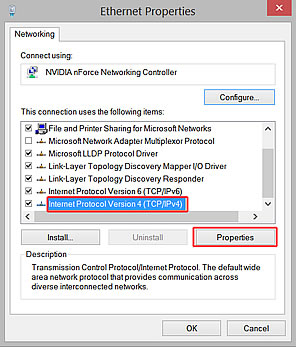
The next step is to highlight Internet Protocol Version 4 (TCP/IPv4) with your left mouse button and select the Properties button below and to the right, again with the left mouse button.
You are now ready to update your settings.
Updating Your TCP/IP Settings:
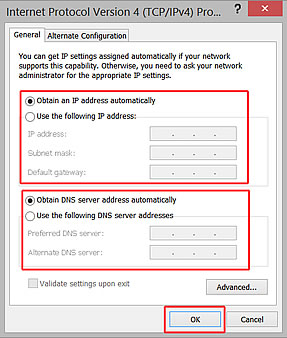
There are two boxes that need to be filled in completely on this screen to ensure best possible service from Skyway West. These are your IP and DNS settings.
Your IP settings are those required in the top box and DNS in the lower box on the page in the image below:
IP settings:
In the documentation provided by Skyway West you would have been given a block of IP addresses, a subnet mask, and a gateway IP. These pieces of information go into the top box in the graphic above.
DHCP: If the block of IP addresses you were provided starts with 192.168.x.x or 10.x.x.x it is entirely possible that you have been provided a DHCP scope of IP addresses. This means there are some IP addresses assigned to your service that can be detected automatically by your PC for your use. If this is the case you do not need to make any changes if your current window looks like the image presented above. If you are unsure you are always welcome to contact Skyway West Support (support@skywaywest.com), who will be happy to assist you.
If you do not have a DHCP scope of IP addresses you will need to enter the IP information on this screen manually. To begin, left click in the dot beside Use the following IP addresses: Proceed to enter the IP, subnet mask and gateway IP information provided to you.
DNS:
If you have a DHCP scope of IP addresses you do not need to make any changes here. DNS will be set for you automatically. If you do not have a DHCP scope then you will need to enter the information manually. To do this click your left mouse button inside the dot beside Use the following DNS server addresses. Skyway West uses two primary DNS servers. They are 216.251.132.32 and 74.50.239.1. Enter these IP addresses into the two fields.
Confirming And Finishing:
At this point you have completed entering the new details for your service. Now it is time to confirm these settings and have them written to your computer so it knows how to get to the Internet. You do this by pressing the OK button at the bottom of the page. When the current page clears press close on the next page back (the page where you chose Internet Protocol Version 4 (TCP/IPv4)). Once this is complete you can close any remaining windows you have open and you are ready to test your settings. Simply bring up an Internet browser (Firefox, Google Chrome or Internet Explorer for example), and see if you can go to the Skyway West web page: http://www.skywaywest.com. If it works you have are ready to go. If not, please repeat the steps above and try again.
If you continue to have difficulties you can contact Skyway West Support who will be happy to assist you. Support can be reached via support@skywaywest.com or 604-482-1212


1 thought on “Configuring Windows 8 PC to use Skyway West IP and DNS Settings”
Comments are closed.